

How To Repair A Ripped Seam In Leather Car Seat
Howard is a DIY guy who usually sells a car in amend condition than he bought it. He prefers older and foreign cars.
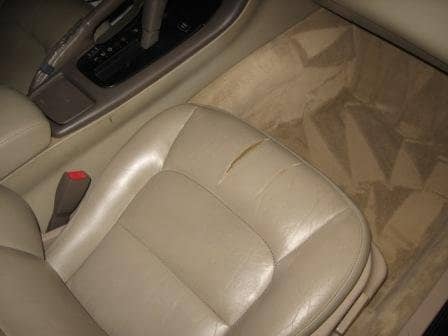
These two rips will just become worse if they are not repaired. The balance of the upholstery is in expert shape, although the leather is hardened from lord's day exposure.
Howard S.
The average hobbyist can do a passable DIY seat repair. Forget ugly duct tape or drawstring seat covers! I vary my repair techniques depending on the nature of the damage.
Rips and tears in auto seats can be divided into two types: Those that border on a seam and those that don't.
For starters, permit'due south acknowledge that if you do it yourself, a repaired seat tear will never exist completely unnoticeable. If y'all desire it to look like new, you'll have to take information technology to a professional upholstery shop.
A professional person can restore seemingly hopeless leather. In a worst-instance scenario, he can completely recover it in cloth or vinyl, starting at approximately $200 per saucepan seat and $250 per bench seat.
Leather materials, nevertheless, volition cost considerably more.
Notation that this commodity does not directly address accidental damage due to misuse, such every bit pocketknife cuts or cigarette burns; even so, similar methods do apply.
Nor does it cover repair of porous cloth or velour textile seating—only leather, vinyl or cloth-backed vinyl.
By the time most cars accomplish the age that the seat coverings brainstorm to dissever due to normal article of clothing and tear, it's commonly not worth paying to have the seats professionally recovered.
At that point, most owners volition either but ignore the damage or endeavour some easy fix, which is usually ineffective.
Moreover, once a rip begins, it will continue to tear if not stopped, and any underlying foam padding that is exposed to sunlight volition rapidly deteriorate.
Rips That Are Non on a Seam
When the seat cloth splits where it is not correct up confronting a seam, we have access to the back on both sides of the rip. For this kind of damage, I glue a piece of material to the back of the rip and hold the gap airtight while the glue dries. That'south easier said than done.
If you're non certain whether your rip is of this blazon, gently probe with a screwdriver or similar apartment blunt instrument to ensure that there is at least ¼ to ½ inch of clearance beyond the edge of the rip.
The ideal tool is a shirt stay, one of those little plastic stiffeners that often comes on the collars of men's dress shirts. At that place will be layers of padding and perhaps other cloth under the ripped surface material.
You want to exist certain those can exist separated from the top layer—the one you want to patch.
Read More from AxleAddict
Selecting Patch Material
It is important to use a suitable patch fabric. I observe that a flake of suede or heavy-duty duck cloth used for uniforms works well.
The critical factor for woven cloth is that it non stretch on the warp and woof (all weaves will stretch some on the diagonal). If the color happens to be a close match, it may make things easier.
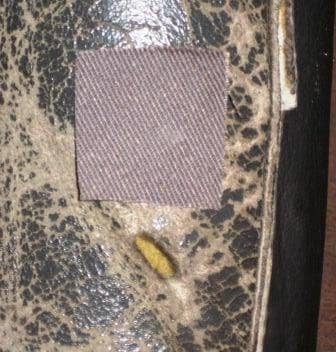
In that location is a small hole below the patch. The cloth is cut about 1/2" larger on all sides.
Howard S.
The gray bolster from this Supra bucket seat shows what it looks like with the fabric tucked in, before gluing.
I try to orient the fabric so that the warp or woof is aligned with the management of stress. The shirt stay is pointing to the patch, which is well-nigh invisible now because of the close color match.
Leather Adhesive and Gluing Technique
Next, we demand to use weights or clamps to apply straight force per unit area to the surface in order to press the leather and glued bankroll together. This is not easy, and so I work it out before applying the glue.
The surface is always curved, and so you need to press hard enough to flatten the curve or utilise a curved pressure level plate. Take care that your pressure clamps are not widening the gap.
If possible, apply clamps to narrow the gap simultaneously. I did not do that for the Lexus because the tan leather had spread apart from drying out and shrinking in the sun. The gray Supra spot is small-scale enough that I didn't bother.

This 2 lb. dolly provided just the right corporeality of pressure and shape. The masking tape but keeps information technology from falling off. Don't apply duct record, which could peel off the top coat!
Howard Due south.
Finished repair is good enough to foreclose further harm to seats that are well worn.
Howard Due south.
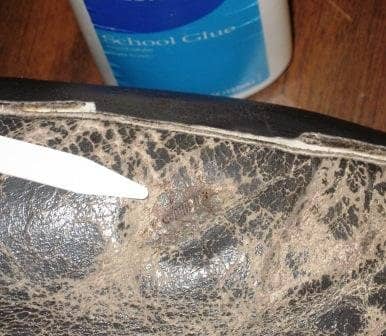
There are many suitable adhesives, but the 1 I prefer is plain old schoolhouse glue. It is easy to utilize, dries clear, remains flexible when dry out, and is water-soluble for clean-up, even subsequently information technology'due south stale.
Professional upholsterers use special water-based adhesives that set up rapidly.
When the adhesive is completely dried, release the pressure level and adore your progress. The gray Supra repair is finished at this stage.
For the damaged Lexus seat shown here (tan), the rips were so long that I chose to patch each end of the rips separately.
I cut 2 strips of textile and overlapped them in the middle as I glued them in, tucking glue under each edge with the shirt stay. (The patch should really be nigh twice as wide equally in this example.)
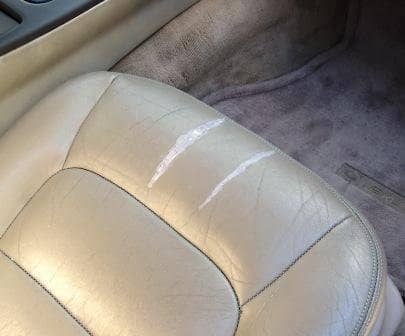
Lack of patience produces a poor color lucifer.
Howard S.
Leather Filler and Coloring
The Lexus leather is quite thick, so the repair needs a filler to bring information technology up flush with the seat surface. Diverse fillers will work. The master requirements are that it be flexible, not-shrinking and can be colored in some way.
In this particular example, I used ordinary cheap caulking chemical compound. Information technology was easy to shape, and any excess cleaned up with water. (I had planned to use a professional person production, but discovered at the last minute that mine had dried out.)
It will usually be necessary to color the repaired surface area to get it to match the seat color. Various companies sell kits which enable you to mix colors for vinyl and leather repairs. Getting a close match is hard though, every bit you can encounter by the tan Lexus instance hither.
The colored medium is frequently of the heat-cure blazon. The technique is much similar ironing. The challenge, of course, is to heat the patch enough to cure it without overheating the surrounding seat material.
There are companies that sell pre-mixed bottles containing an exact friction match to your auto's seat color. Meet the last paragraph of this article for ordering information.
Rips That Border a Seam
In situations where the rip borders right upward against a seam, information technology unremarkably isn't possible to slip a fabric patch under the seam. In this case, the solution is to patch over the tiptop using a remnant of the same leather or vinyl used on the seats.
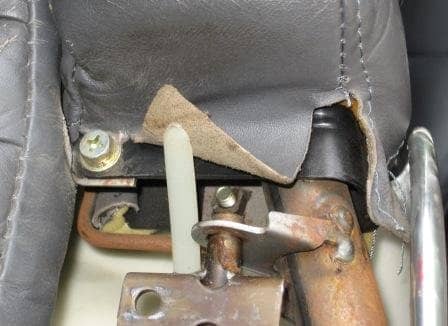
All seats have some backlog material that is hidden from view beyond where it attaches to the seat frame. To admission this requires removing a seat or some role of it.


Colour-Matched Leather and Vinyl Patches
Many "all leather" seats will actually accept leather on surfaces that will receive the most clothing, only material-backed vinyl for the sides or other areas that will receive footling abrasion. If you accept a option, the cloth-backed vinyl is preferable considering it is thinner.
When I removed the gray bolster from the Supra, I found a nice big piece of vinyl, although I never found where this had really been used on visible surfaces. Annotation the contrast betwixt the thickness of the vinyl (0.0235 inch) and the leather (0.0570 inch).

This seat is in a classic auto that is still all original, although information technology shows obvious signs of wear and patina. The owner wants to continue it original rather than restoring it.
Howard S.
I did non recollect of photographing this expanse before starting. Suffice it to say that the damaged surface area was nearly as long as the patch. It was not nearly that wide, though heavily worn.
Since I was patching anyway, I made it as broad as the scrap material permitted, thus reinforcing the weakened area that tends to accept the most wear on this blazon of seat.
Gluing and Clamping Technique
If exposed open up-jail cell foam may come in contact with glue from the patch, I insert a thin not-porous sheet—plastic, wax newspaper, etc.—betwixt the foam and surface material.
If glue is permitted to saturate the foam and harden, information technology volition ruin the sponginess and stiffen it.
Ensure that your pressure plate—the surface that will directly contact the patch and whatever glue that squeezes out around information technology—is less porous than the seat surface.
Otherwise, when you release the pressure, $.25 of the seat material may separate and adhere to the clench. When I utilize a wood cake, I wrap it with plastic cling wrap from the kitchen in social club to release from the mucilage.
Metal clamps don't need this precaution. Since I use a h2o-soluble glue, I can clean upwardly any residue with a moist rag.
Positioning a patch that has to edge snugly up against a seam can exist difficult considering it volition tend to slide effectually one time gum is applied and because the pressure level plate generally obscures vision. I practice aligning it a few times earlier applying the glue.
Commercial Products
Kits are bachelor with everything necessary to do the job. Typical contents include subfabric, agglutinative and primary colors for mixing. Kits with a heat-transfer tool work better on vinyl and include a few leather-grain transfer papers.
Those that do not require rut piece of work better on leather. The toughest function of most basic kits is trying to mix the colors for a proficient match. Unfortunately, you get what you pay for.
The discount car stores sell only the cheapest kits, ranging from nearly $10 to $25.
Better quality materials are available locally from wholesalers that supply professional shops.
Online specialty retailers such as Leather Magic, MagicMender and LeatherWorldTech that sell to professional shops also have kits for about $60 that come with a canteen of pigmented leather top coat paint that you lot specify.
They stock hundreds of pre-mixed colors to match almost any product motorcar seat. That may well be worth the cost in order to avoid the aggravation of trying to mix and match the seat leather from basic colors.
Torn Seat Experiences
This commodity is accurate and true to the best of the writer's knowledge. Content is for informational or amusement purposes only and does non substitute for personal counsel or professional advice in business, fiscal, legal, or technical matters.

Source: https://axleaddict.com/auto-repair/Leather-Repair-Car-Seats-Vinyl-DIY-Auto-Upholstery
Posted by: mooreloffiry.blogspot.com
0 Response to "How To Repair A Ripped Seam In Leather Car Seat"
Post a Comment